Sales Conversion Optimization by analysing ad campaigns Tracked by Facebook and Prediction using Random Forest Regressor

Table of Contents

Aim/Objective/Goal

To optimize Sales conversion and predict future sales

Lets see how user had to use python coding for analyzing, cleaning, transforming & visualizing the data in one of the kaggle article
https://www.kaggle.com/code/mansimeena/facebook-ad-campaigns-analysis-sales-prediction/notebook

				
					<import numpy as np
import pandas as pd

import os
for dirname, _, filenames in os.walk('/kaggle/input'):
    for filename in filenames:
        print(os.path.join(dirname, filename))


					df=pd.read_csv("/kaggle/input/clicks-conversion-tracking/KAG_conversion_data.csv")


Checking for null values

				
					df.info()

<class 'pandas.core.frame.DataFrame'>
RangeIndex: 1143 entries, 0 to 1142
Data columns (total 11 columns):
 #   Column               Non-Null Count  Dtype  
---  ------               --------------  -----  
 0   ad_id                1143 non-null   int64  
 1   xyz_campaign_id      1143 non-null   int64  
 2   fb_campaign_id       1143 non-null   int64  
 3   age                  1143 non-null   object 
 4   gender               1143 non-null   object 
 5   interest             1143 non-null   int64  
 6   Impressions          1143 non-null   int64  
 7   Clicks               1143 non-null   int64  
 8   Spent                1143 non-null   float64
 9   Total_Conversion     1143 non-null   int64  
 10  Approved_Conversion  1143 non-null   int64  
dtypes: float64(1), int64(8), object(2)
memory usage: 98.4+ KB


Replace column value

				
					df["xyz_campaign_id"].replace({916:"campaign_a",936:"campaign_b",1178:"campaign_c"}, inplace=True)


Data Visualization

Count of Campaigns

				
					# count plot on single categorical variable 
sns.countplot(x ='xyz_campaign_id', data = df) 
# Show the plot 
plt.show()
				
			
Campaign Graph

Campaign vs Approved_Conversion

				
					#Approved_Conversion
# Creating our bar plot
plt.bar(df["xyz_campaign_id"], df["Approved_Conversion"])
plt.ylabel("Approved_Conversion")
plt.title("company vs Approved_Conversion")
plt.show()


Distribution with age

				
					# count plot on single categorical variable 
sns.countplot(x ='age', data = df) 
# Show the plot 
plt.show()


Distribution with gender

				
					# count plot on single categorical variable 
sns.countplot(x ='gender', data = df) 
# Show the plot 


Count of interest

				
					# count plot on single categorical variable 
fig_dims = (15,6)
fig, ax = plt.subplots(figsize=fig_dims)
sns.countplot(x ='interest', data = df) 
# Show the plot 
plt.show()


Japio without coding

Now, let’s see below how we can achieve the Kaggle things in Japio without coding skills

Dataset

Data Analysis and Transformation

Loading Data

You can upload data into Japio from various sources, such as CSV files, Excel spreadsheets, and by connecting to your Facebook account  .Following are the steps to upload data.

Load Data by connecting to the facebook account :
  1. Go to Data Manager > Data Source 
  2. Select facebook as shown below 

3.After clicking on + Connect  you can connect to your facebook  account

Load data using other sources :
  1. If you want to load data into Japio from other sources such as CSV files or Excel spreadsheets, you can follow the steps below. These steps demonstrate how to load data using a CSV file:
Step 1
After logging in to the Japio application at https://app.japio.com , you will find the “Data Manager” option on the left side. Click on the Data Manager to proceed .
Step 2
If you already have a connection on which you want to transform or visualize the data, click on “My Connections” at the top of the page. You will be able to see your existing connections there. If you don’t have any existing connections, click on “+NEW CONNECTION” located in the top right corner of the page to create a new connection.
Step 3

After clicking on “+NEW CONNECTION” you will be presented with various data sources (all sources shown below ) from which you can fetch your data into Japio. This will enable you to transform and work with your data within Japio’s platform.

Suppose you want to upload a csv file then click on csv data source as shown below

https://app.japio.com/data-manager/data-source

Step 4

After selecting your desired data source and filling in the required fields, you can click on the “Connect” button to establish the connection between Japio and the selected data source. This will initiate the process of importing the data into Japio for further analysis and manipulation.

After successfully loading the data, you will be redirected to the data connection page in Japio, specifically to the URL: https://app.japio.com/data-manager/data-connections/data-connection/ connector-id. Here, you will be able to see the data you loaded with the name you provided during the data connection setup. From this page, you can access and work with the loaded data for further analysis, transformation, visualization, or any other desired operations within Japio.

Access of loaded data

To access the data you have loaded into Japio and perform further operations, you can follow these steps:


  1. Click on ” Data Manager >My Connections” to view your connected data sources.
  2. Search for the specific data source from which you have loaded your data.
  3. Once you have located the data source, you will see a count or number associated with it, indicating the number of connections.
  4. Click on the count or number of connections to further explore and interact with the connected data source.
5. After clicking on the count, you will be able to see all your connections and access your active connections. From there, choose the specific connection on which you want to transform the data . Click on the “+” symbol. This will allow you to proceed with the data transformation process.

6. . After clicking on the “+” symbol, you will be redirected to a page with a URL like “https://builder.japio.com/public/datasetbuilder-view/” followed by a connection ID. This page allows you to transform your data. Select the required fields and click on “Get Data” to proceed with the data transformation process.

Transform Data

  1. Access the page “https://builder.japio.com/public/datasetbuilder-view/”  followed by the connection ID by following the steps mentioned in the “Access of loaded data” section.
  2. On the page, locate and click on the “+ Add Transform” button, which is located on the left side of the page. This will open up the transformation options as shown below.
3. Choose the desired type of transformation rule based on your requirements. Here are some common types of transformation rules you can apply:
Check Null Values :
  1. Following steps will explain how to check  Null values 

    Click on + Add Transform  > Filter Data

2. In the transformation panel, select the desired column from the “Column” dropdown. This is the column in which you want to see null values.

3. Choose the operator “Is blank” from the operator field. This operator will filter the data to show only the rows where the selected column is null or empty.

4. If you want to add additional filters, click on the “+ Add another filter”. This allows you to apply multiple filters to further refine your data based on different conditions.

5. Repeat steps 2 and 3 for each additional filter you want to add. Select the desired column and operator for each filter.

6. After adding all the desired filters, click on the “Run” button to apply the filters and see the filtered data.

Remove Or Replace

Following steps will explain how to remove or replace some values from the dataset. You can remove Null values  or you can replace some  value from the dataset with  desired value.


1 .  Click on  + Add Transform > Clean.

2.Choose the column name from which you want to remove or replace the null values.

3. Select desired Operator as per your requirement such as “Is blank or null” from the operator field. The value field will be automatically removed.

4. Select the desired action:

a. To remove all rows in which the selected column has null values, choose Action >Remove matching row .

b. To replace null values with a specific value, choose Action >Replace this value. This will prompt you to enter a value in the “Replace Value” field.

5.   If you need to apply multiple clean transformations, click on “+ Add another”.

6.Finally, click on the “Run” button to execute the transformation.

By following these steps, you will be able to remove or replace specific values in the selected column with the desired replacement value.

Example
In this example, I am going to replace the campaign IDs with corresponding campaign names. This dataset contains campaign IDs 916, 936, and 1178, I will replace them with campaign names “campaign_a”, “campaign_b”, and “campaign_c” respectively.

After adding three clean transformation rules based on my requirements and clicking on the “Run” button, I obtained the desired result, which is shown below

Save this data after adding transformation rules

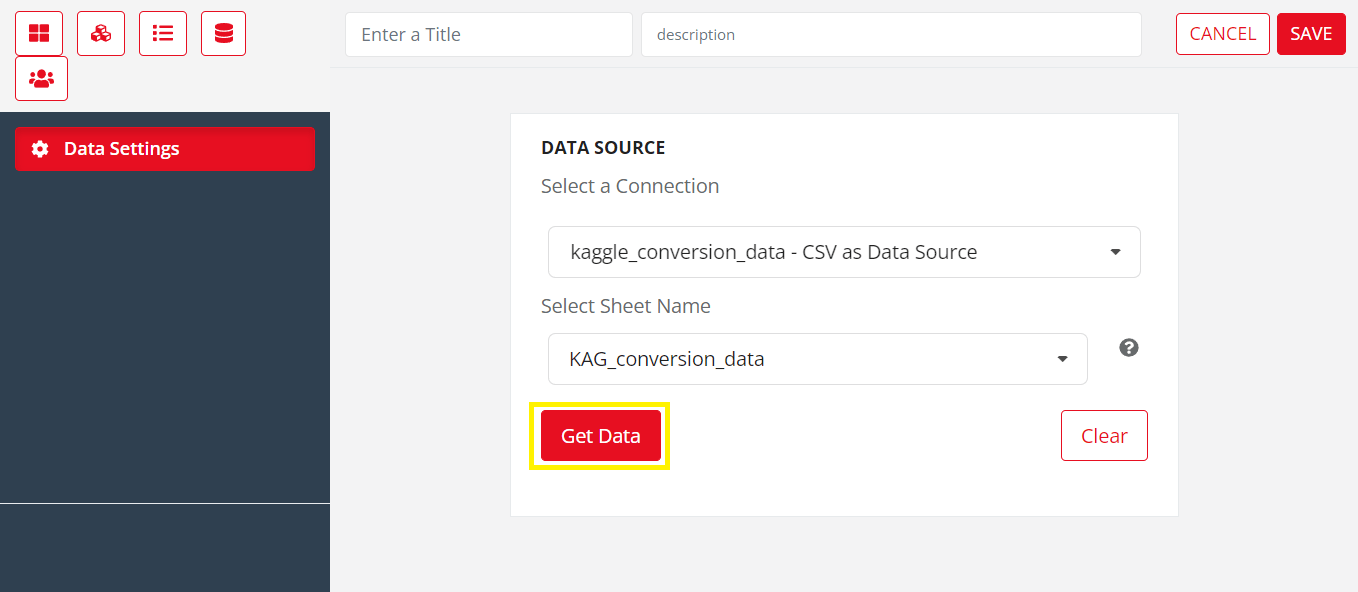
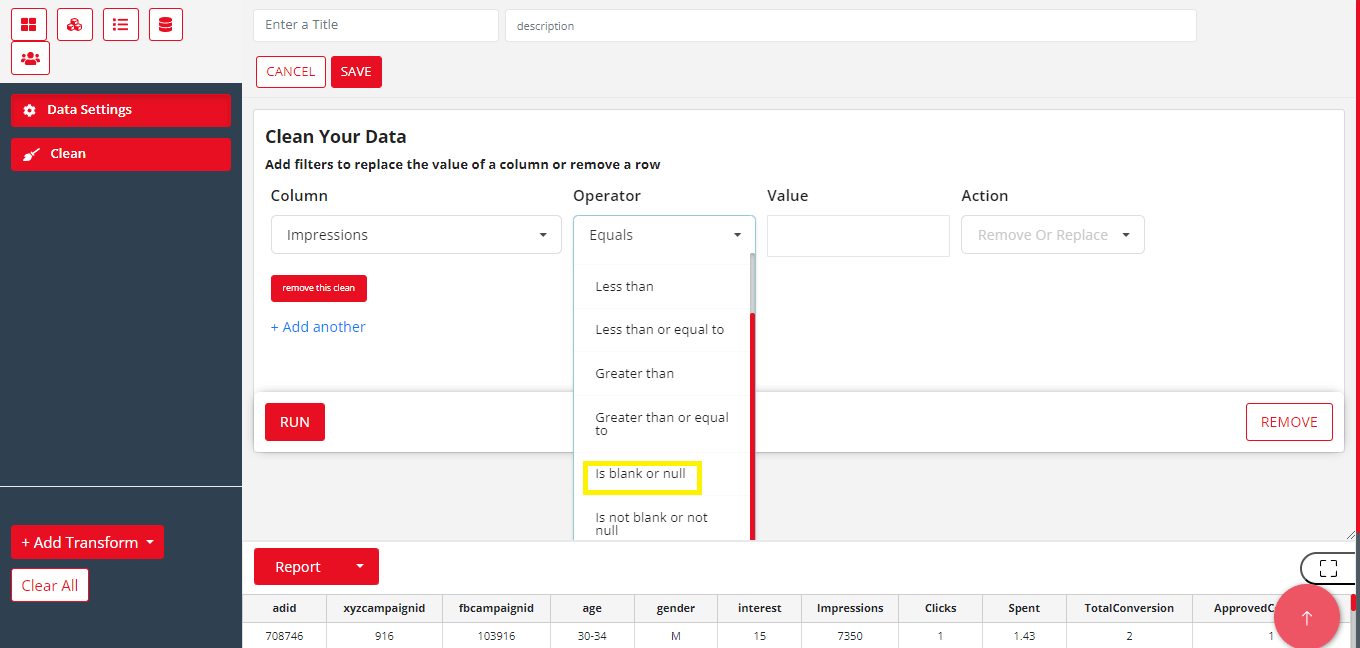
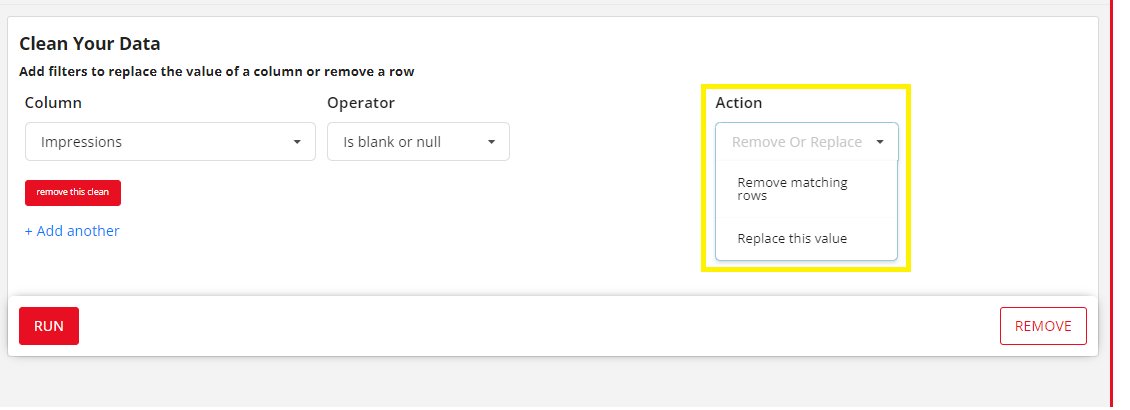
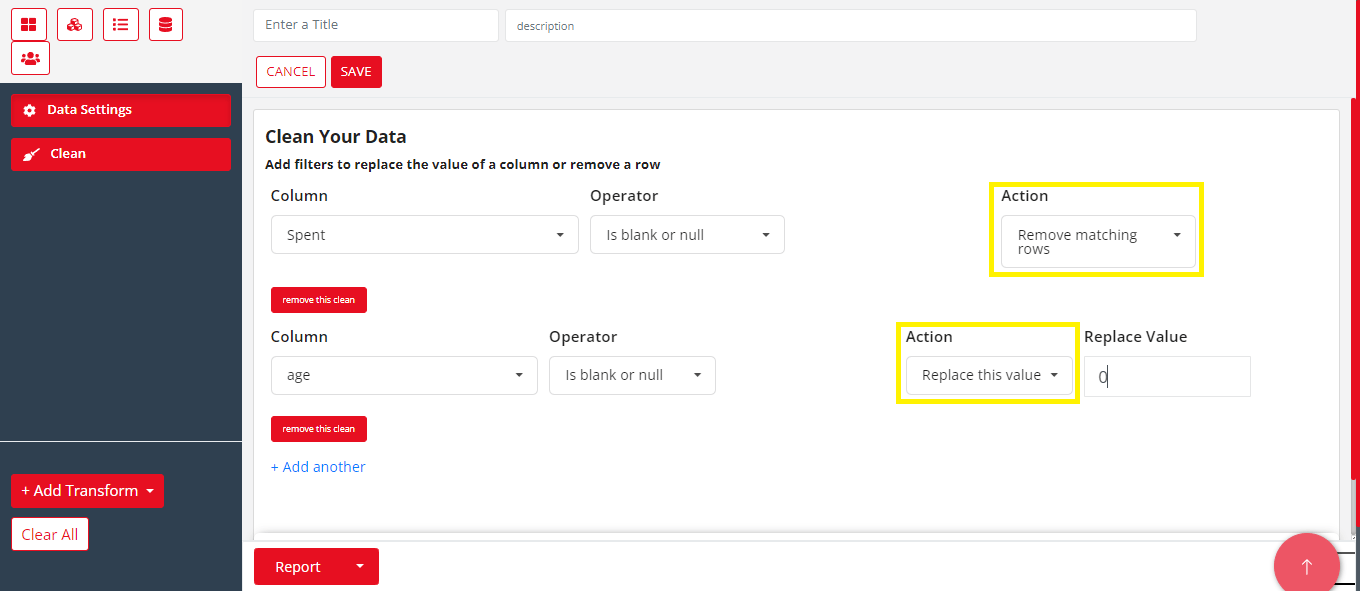
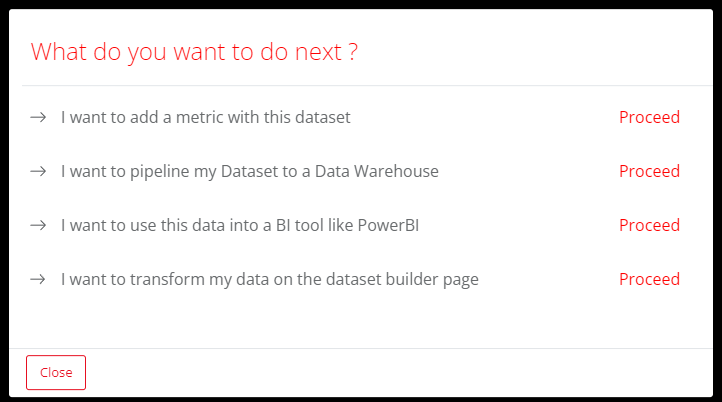
To save the transformed data, follow these steps:

  1. Add all the desired transformation rules to the data as per your requirements.

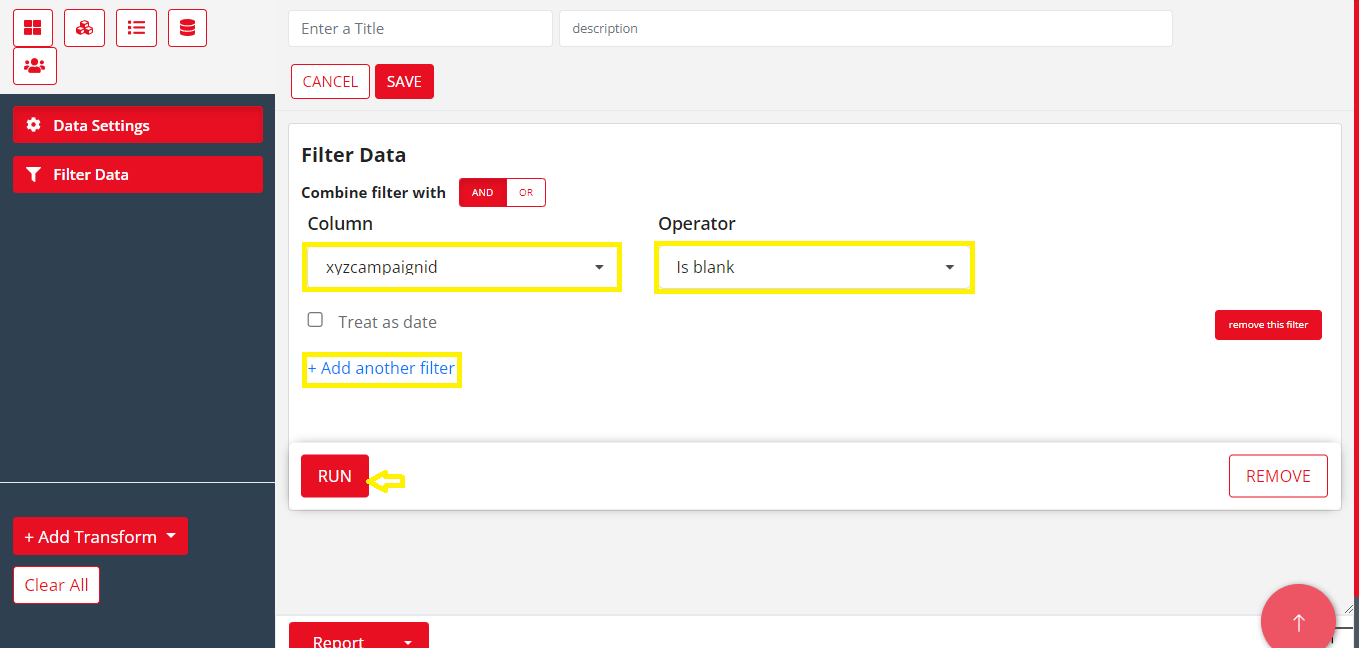
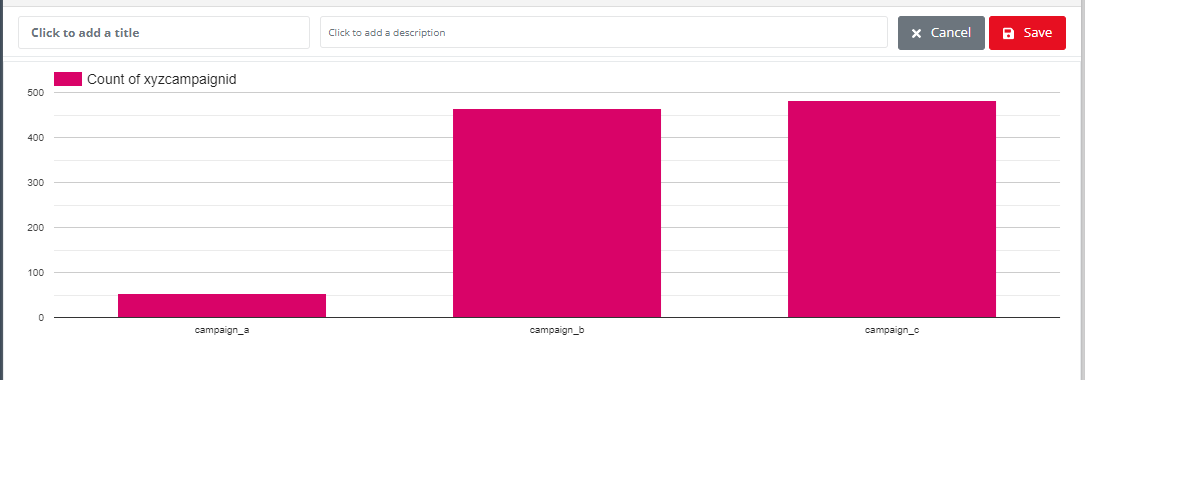
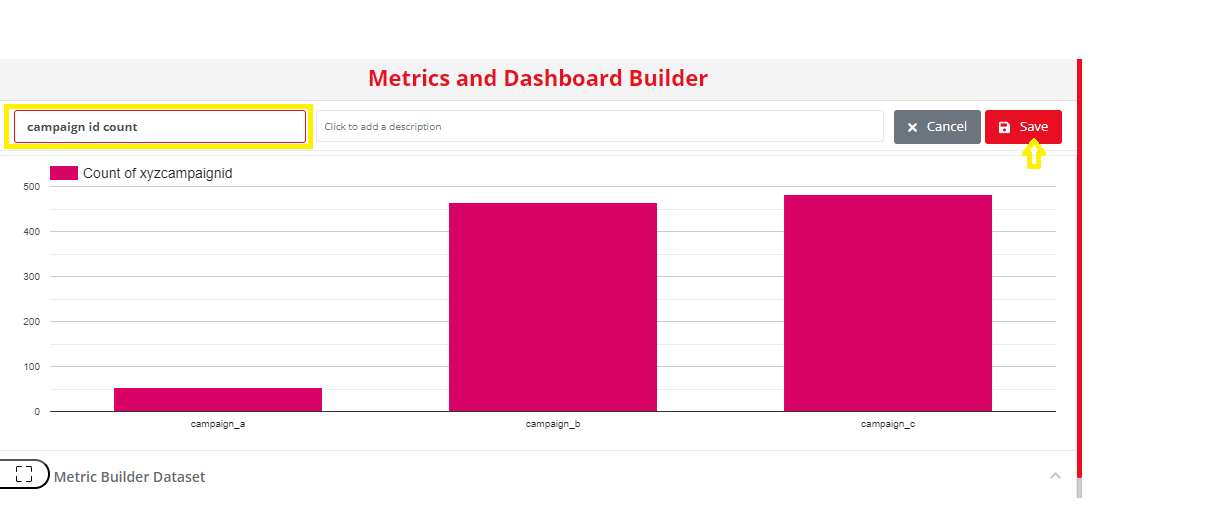
2.At the top of the page, on the Japio Dataset Builder interface located at “https://builder.japio.com/public/datasetbuilder-view /” followed by the connector ID, you will find a field where you can enter a title for the dataset. Enter a title in this field to save the dataset with the specified title.

  1. Optionally, you can add a description for the dataset in the provided field (this step is optional but can be helpful for documentation purposes).
  2. Finally, click on the “Save” button to save the transformed data with the specified title and description.

By following these steps, you will be able to save the transformed data in Japio with a title and an optional description for future reference and usage.

To proceed after saving data instantly
After clicking on save, a dialog box will appear within 30-60 seconds.

Click on “Proceed” to navigate to the desired page. If you want to continue transforming your data on the Dataset Builder page, click on “Proceed” for “I want to transform data on the Dataset Builder page.” Alternatively, if you want to visualize your data by adding a metric, click on “Proceed” for “I want to add a metric with this dataset.”

Download the transformed data for further usages

After you analyzed the data and transformed it, you can now use it wherever you need. For example, you may need this to train a model, use a BI tool like PowerBI or use in Data warehouse. 


To download your transformed data follow the following steps 

  1. Log in to Japio if you haven’t already done so.
  2. Go to the Data Manager section, which is typically located in the sidebar or menu.
  3. Click on “My Datasets” to access your saved datasets. Here, you will see a list of your datasets with the titles you provided when saving the data.
  4. After locating your desired dataset in Japio’s Data Manager > My Datasets section, you should be able to see a download icon. By clicking on this icon you will be able to download the dataset in either JSON format or CSV format, depending on your selection.

Visualization of data

Go to the metric builder page

From the metric builder ( https://builder.japio.com/public/metricbuilder/ followed by dataset id ) you can visualize your data by adding various metrics

 there is two way to visit  metric builder page

1. To proceed after saving data instantly

After clicking on save, a dialog box will appear within 30-60 seconds.

Click on  “Proceed” for “i want to add a metric with this dataset” as shown above .This will  redirect  to the page (https://builder.japio.com/public/metricbuilder/ followed by dataset id) where you can  visualize your data by using metrics.

2. If you already have saved dataset
Follow the following steps
1. Login to Japio by visiting https://app.japio.com/ if you already haven’t so .
2. On the left side of the page, click on “Data Manager.”
3. Click on “My Datasets” to access all your saved data. You can locate your saved data by searching for the title name you provided at the time of saving.

4.  After finding the desired dataset, click on the metric arrow, which is located at the “Action “ field in the extreme right of the page.Here you can visualize your data by adding different types of metrics.

Add Metrics to visualize data

Check which campaign has the most number of ads

You can Follow  the steps given below


If you are on the https://builder.japio.com/public/metricbuilder/ followed by dataset id  page 

  1. Click on “Chart Type” to select the desired chart type. Choose the “Column” type for your chart..
2. After selecting the column chart type, click on “+Add Value” in the y-axis field. On the left side, select “Count,” and on the right side, select “ayzcampaignid.”
3. Select ayzcampaignid in x-axis field

 From the above metric we can see that the campaign_c has the most number of ads
4. To save this metric follow the “Save metrics” steps

better Approved_conversion count
  1. Select Chart type  as Column
  2. In y-axis select Count as operator and select ApprovedConversion
  3. In x-axis select ayzcampaignid

It’s clear from the above graphs that compaign_c has a better Approved conversion count, i.e. most people bought products in campaign_c.

4. To save this metric follow the “ Save metrics ” steps

distribution with Age
  1. This shows which age group is  participating in the most  ads campaign.

To save this metric follow the “ Save metrics ”  steps

Distribution with gender

To save this metric follow the “ Save metrics ”  steps

Count of Interest

To save this metric follow the “ Save metrics ”  steps

Save metrics

  1. After configuring the metric, you can save it by giving it a title. At the top of the page, you will see a field labeled “Click to add a title.” Click on that field and enter a title for the metric. This will allow you to save the metric with the specified title for future reference and use.

2.  After clicking on the “Save” button, a dialog box will appear giving you two options to save your metrics. You can either choose to create a new dashboard specifically for these metrics or save them to an existing dashboard that you have already created

Create New Dashboard

After selecting the option to create a new dashboard, you can follow the steps below:

    1. After clicking on save button you will be redirected to the  https://app.japio.com/dashboard/view/ followed by metric id  page  where you can edit the metric or you can save more metrics there 

2. After navigating to the dashboard page (e.g., “https://app.japio.com/dashboard/view/” ), you can click on the “Edit” button to modify the dashboard. In the edit mode, you can give a name to the dashboard, such as “Facebook Ads,” in the provided field. Once you have entered the desired name, click on the “Apply” button to save the changes and update the dashboard name to reflect your chosen name.

Select Existing Dashboard

save metrics by choosing “Select Existing Dashboard” and choose your dashboard name such as “facebook ads”

Use FB Ads Predictive Dashboard Template

Use our patented technology,  we have created a predictive dashboard template which allows you to connect your Facebook account and access pre-built metrics and visualizations for analyzing your Facebook ads/campaigns. This feature eliminates the need for manual data extraction and analysis, providing you with ready-to-use insights in a visually appealing format and also offers prediction capabilities. You can forecast future trends and outcomes based on historical data. For this go through the following steps 

https://app.japio.com/public_dashboard 

  1. Click on Dashboard > Predictive Dashboard. After this scroll down and hover on Facebook Ads Dashboard Template  you will see “Preview” and “Use Template”
2. After clicking on “Use Template” in the automated dashboard, a dialog box will appear, allowing you to select your Facebook Ads account if you have already connected it to Japio.

3. If you don’t have a connected Facebook Ads account, you can still access the automated dashboard in Japio by clicking on “Connect a new Facebook Ads account” This option will guide you through the process of connecting your Facebook Ads account to Japio. Once the connection is established, you will be able to access your dashboard with pre-built metrics and visualizations related to your Facebook advertising campaigns. The dashboard will be populated with data from your connected Facebook Ads account, providing you with valuable insights and analysis without the need for manual data extraction or setup.

Conclusion

As we see above how Japio can help  marketers or any users to analyze their ads/campaign data without hand coding. We demonstrated above the both ways manual and automated (predictive dashboard template).